Advertiser Disclosure

Many of the credit card offers that appear on this site are from credit card companies from which we receive financial compensation. This compensation may impact how and where products appear on this site (including, for example, the order in which they appear). However, the credit card information that we publish has been written and evaluated by experts who know these products inside out. We only recommend products we either use ourselves or endorse. This site does not include all credit card companies or all available credit card offers that are on the market. See our advertising policy here where we list advertisers that we work with, and how we make money. You can also review our credit card rating methodology.

How To Take Your Own Passport Photo at Home [Detailed Guide]

Katie Seemann's image
Katie Seemann
Katie Seemann's image

Katie Seemann

Senior Content Contributor and News Editor

400 Published Articles 63 Edited Articles

Countries Visited: 29U.S. States Visited: 29

Katie has been in the points and miles game since 2015 and started her own blog in 2016. She’s been freelance writing since then and her work has been featured in publications like Travel + Leisure, F...
Edited by: Keri Stooksbury
Keri Stooksbury's image

Keri Stooksbury

Editor-in-Chief

52 Published Articles 3491 Edited Articles

Countries Visited: 50U.S. States Visited: 28

With years of experience in corporate marketing and as the executive director of the American Chamber of Commerce in Qatar, Keri is now editor-in-chief at UP, overseeing daily content operations and r...
Jump to Section

We may be compensated when you click on product links, such as credit cards, from one or more of our advertising partners. Terms apply to the offers below. See our Advertising Policy for more about our partners, how we make money, and our rating methodology. Opinions and recommendations are ours alone.

Key Takeaways

  • Use a plain white background with even lighting to avoid shadows.
  • Follow guidelines for head size and position, keeping a neutral expression with eyes open, and ensuring the photo is acceptable for passport use.
  • You can use the photo tool on the U.S. Department of State’s website to resize and crop your digital photo to the required dimensions.

Taking your own passport photo might not be something you’ve thought of in the past. But in today’s world, the convenience of taking your passport photo at home is something you might want to take advantage of.

This guide will give you step-by-step instructions for taking your own passport photo, including photo requirements, so you’ll be ready to go the next time you decide to travel.

How To Take Your Own Passport Photo

Whether you’re looking to apply for a new U.S. passport or renew your current U.S. passport, it’s good to know that you can take your own passport photo quickly and easily.

Step 1: Take Your Passport Photo

  • Stand in front of a white background. You can’t digitally alter the background to make it white. If you don’t have any white walls, you can get a large sheet of white paper or poster board to tape up on the wall (make sure the edges of your paper and any tape you used are not visible in your photo).
  • Stand near a window on a sunny day for the best light. Don’t stand in direct sunlight because you can’t have any shadows in the photo. In any light, using a flash is a great way to avoid shadows behind your head.
  • Have a friend or family member take a close-up photo of your head and shoulders — selfies aren’t acceptable.
  • Make sure your photo meets all of the requirements in regard to your expression, pose, hair, etc. (details below).

Step 2: Upload and Resize To Fit Requirements

For Postal or In-person Applications

When applying for your first passport or renewing it by mail or in person, you’ll need to provide a printed passport photo in the correct size of 2 x 2 inches (51 x 51 mm). You can upload your photo to many sites that will help format it to the correct size of 2 x 2 inches (51 x 51 mm) ready for printing.

Whichever site you choose to use, follow their instructions to upload, size, and order your photos.

For Online Renewals

Passport photo for online renewal
Accepted space for a digital passport photo to be cropped. Image Credit: U.S. Department of State

When renewing your passport online, you can submit a digital photo rather than a printed version. The U.S. Department of State website has a photo tool that will resize and crop your digital photo to the required dimensions. You’ll still need to follow all the guidelines below on how to take a suitable passport photo, and when it comes to uploading your photo using this tool, you must also follow these guidelines:

  • The photo must be at least 600 x 600 pixels to allow room for cropping
  • It must be a color photo in sRGB color space (which is the standard output format for most digital cameras)
  • The uploaded photo must be in JPEG format
  • The size of the photo file must be larger than 54KB, but must not exceed 10MB
  • The photo compression rate should be less than 20:1, so it’s best not to send your photo by WhatsApp or any cloud-based applications

After submitting your photo via the photo tool, this will be reviewed by a Department of State employee who will confirm whether your passport photo has been accepted or not as part of your application.

Step 3: Complete the Process

If applying for your passport by mail, you’ll need to attach your photo to your application correctly. This is done with 4 staples vertically placed in the corners as close to the edge as possible. Your application will show marks exactly where the staples should go.

If you’re applying for a new passport in person, you can take this photo and your application to an acceptance facility. Expedited service may also be available if needed.

Hot Tip: Want to keep your passport looking stylish? Take a look at these passport holders and covers.

Passport Photo Requirements With Photo Examples

Passport Photo Basics

All passport photos must adhere to a very specific set of standards.

Your photo must be submitted in color and should be no more than 6 months old. The background should be white or off-white, and you can’t use any filters. You’ll also need someone else to take the photo as selfies are not acceptable for your passport.

Print Size and Quality

  • The photo must be high resolution and not pixelated, grainy, or blurry
  • The photo must be 2 x 2 inches (51 x 51 mm)
  • Head size must be 1-1 3/8 inches (25-35 mm) from the bottom of your chin to the top of your head
  • The photo must be printed on photo-quality paper, either matte or glossy
  • No digital changes are allowed (including changing your background to white or removing red-eye)
  • The photo can’t be damaged with holes, creases, or smudges
  • There shouldn’t be any shadows

Both of these photos are examples of approved passport photos:

Acceptable Passport Photos
These passport photos are acceptable. Image Credit: U.S. Department of State

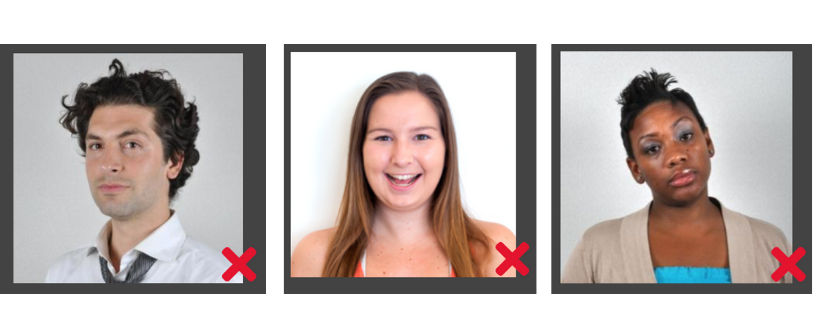
These 3 photos are examples of passport photos that are NOT acceptable:

Unacceptable Passport Photos
These passport photos are unacceptable for the following reasons (left to right): shadow, underexposure, and inaccurate colors. Image Credit: U.S. Department of State

Pose and Expression

  • Both eyes must be open
  • Your expression can be either neutral or with a natural smile
  • The photo must be a full-face view (side angles are not accepted)
  • Young children don’t need to make eye contact with the camera
  • Babies can be lying on their backs on a white blanket (for more tips, check out our step-by-step guide to getting a passport photo for your baby)

Both of these photos show examples of acceptable passport photo expressions:

Approved Passport Photos examples
These passport photo expressions are acceptable. Image Credit: U.S. Department of State

The following 3 photos are examples of passport photo expressions and poses that are NOT acceptable:

Unacceptable Passport Photos due to expressions
These passport photos aren’t acceptable because they (left to right) aren’t facing forward, display an exaggerated expression, and have a tilted head. Image Credit: U.S. Department of State

Attire, Hats, Glasses, and Hair

  • Glasses should not be worn. If you can’t remove your glasses for medical reasons, you’ll need to include a signed note from your doctor with your application.
  • Clothing should be your everyday attire. Uniforms, anything that looks like a uniform, and camouflage can not be worn.
  • Hair should not be covering your face.
  • No hats or head coverings should be worn. Exceptions include religious and medical reasons.
    • If you wear a hat or head covering for religious reasons, you’ll need to include a signed statement with your application that verifies your hat or head covering is worn continuously in public as part of your religion.
    • If you wear a hat or head covering for medical reasons, you’ll need to include a signed statement from your doctor verifying that your hat or head covering is worn daily for medical purposes.
    • If you have a religious or medical exception, your hat or head covering must not obscure your hairline or cast shadows on your face. Your full face must be visible.
  • No headphones or wireless hands-free devices can be worn.
  • Jewelry and facial piercings can be worn if they don’t cover your face.
  • Facial tattoos are acceptable.

Here is an acceptable way to wear a head covering in a passport photo:

How to wear a headcovering in a passport photo
Image Credit: U.S. Department of State

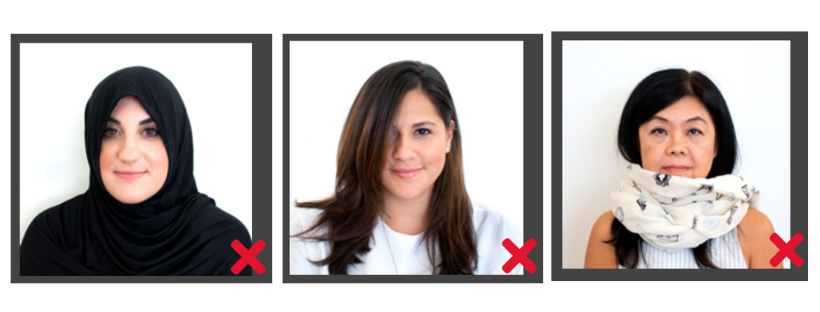
The 3 photos below are examples of passport photos with head coverings, accessories, and hair that are NOT acceptable:

Hair and head coverings in Passport photo
These are unacceptable ways to wear your hair, accessories, and head coverings for a passport photo. Image Credit: U.S. Department of State

Final Thoughts

Being able to take your own passport photo saves you time, and that means you can get your passport application or renewal underway as quickly as possible. Plus, it’s nice to know that you can renew your passport without leaving home — a matter of convenience that’s hard to beat.

Frequently Asked Questions

Can I take my passport photo at home?

Yes, it’s quick and easy to take your passport photo at home. You’ll need a white background in a well-lit area plus a friend to take the photo for you. You can then upload it to get the correct size and order prints online or get prints from your local store.

Can I use my iPhone to take a passport photo?

Yes, you can use your iPhone or another smartphone to take your passport photo at home. Just make sure you have good lighting, a white background, and a friend to help you because selfies aren’t allowed.

Can I smile in my passport photo?

Yes you can have a natural smile in your passport photo. A neutral expression is also acceptable. Avoid any expressions that are exaggerated and make sure you are looking directly at the camera.

How can I convert my photo to passport size?

Your passport photo should be 2 x 2 inches in size. You can upload your photo to a website that can convert it into the correct passport size. Websites that can assist in converting your photo to passport size include Oddprints.com, ePassportPhoto.com, and even larger retailers like Walmart.

What can you not do in a passport photo?

When taking your own passport photo, you must not shut your eyes, tilt your head, be wearing any head or eyewear (unless for medical or religious reasons,) have an exaggerated facial expression, have any hair covering your face, or have your body angled sideways. Check out the information above for the full list of dos and don’ts.

Where can I take my own passport photo?

You should ideally take your passport photo in a location with even lighting to avoid shadows and against a white or off-white background.

How do I renew my passport and take my own photo?

When renewing your passport online, you can submit a digital photo rather than a printed version. The U.S. Department of State website has a photo tool that will resize and crop your digital photo to the required dimensions.

Katie Seemann's image

About Katie Seemann

Katie has been in the points and miles game since 2015 and started her own blog in 2016. She’s been freelance writing since then and her work has been featured in publications like Travel + Leisure, Forbes Advisor, and Fortune Recommends.

INSIDERS ONLY: UP PULSE

Deluxe Travel Provided by UP Pulse

Get the latest travel tips, crucial news, flight & hotel deal alerts...

Plus — expert strategies to maximize your points & miles by joining our (free) newsletter.

We respect your privacy. This site is protected by reCAPTCHA. Google's privacy policy  and terms of service  apply.

Deluxe Travel Provided by UP Pulse
DMCA.com Protection Status